Your shopping cart is empty!
Categories
-
Products
- - New Products
- - Best Sellers
- - Keyboard
- - RS-485 Converter
- - Arduino
- - Raspberry Pi
- - Input/Output Expansion Board
- - ROBOT
- - Temperature / Humidity Modules
- - Motors / Motor Driver Boards
- - Wifi / Wireless Modules
- - Solid State Relay
- - Relay Modules
- - Sensors
- - Breadboards (Protoboards)
- - Wires / Cables
- - Components / Parts
- - IC
- - Connectors / Pin Headers
- - Heat Sinks
- - ESD Bag / Anti Static Bag
- - Healthy Products
- PCB Assembly
- Download
- Keyboard Technical Educator
- Technical Repair
- Learning from Experience
- Strategic Technical Consultant
- How to Order

การโปรแกรม Firmware สำหรับใช้งาน Keyboard - Keypad ด้วยโปรแกรม QMK Toolbox

 Posted: 05/07/2021
SD Card Shield Plus for Arduino (Read/Write Data)
")
")
")
")
")
Price: $11.73
Price in reward points: 3480
Price in reward points: 3480
10 or more $11.72
50 or more $11.71
100 or more $11.70
50 or more $11.71
100 or more $11.70
Qty:
- OR -
Add to Wish List
Add to Compare
Add to Compare
![]() SD Card Shield Plus for Arduino (Read/Write Data)
SD Card Shield Plus for Arduino (Read/Write Data)
SD Card Shield Plus for Arduino is well designed Data Logging Shield works with arduino motherboard and SD card. Support FAT16 or FAT32 file system and support SD card or SDHC card type. The SD Card Shield Plus includes I2C EEPROM-24LC256 (32Kbyte) : Electrically Erasable Programmable Read Only Memory is a type of non volatile memory used in computers and other electronic devices to store small amounts of data that must be saved when power is removed, Real Time Clock (RTC-DS1307) timestamps all your data with the current time. Datetime format is YYYYMMDDHHMMSS between 1970-01-01 00:00:00 to 2037-12-31 23:59:59 (Year-Month-Day), I2C connector will be connected with external I2C devices or other boards, Stacking Headers with Arduino Standard 0.1" Headers will be stacked with other arduino motherboards, RTC battery 3V (CR2032) backup lasts for years, 3.3v level shifter circuitry prevents damage to your SD card, 3.3v regulator outputs a steady and stable 3.3V DC output direct to SD card, Tact Switch will be reset operation of microcontroller and also support optional SD_CS pin, SDA pin and SCL pin.
User can learn SD Card Shield Plus with example programs as follows :
- ReadWrite program
- Datalogger program
- DumpFile program
- Files program
- CardInfo program
- Listfiles program
User can use SD Card Shield Plus for Arduino to design projects requiring RTC and SD card for logging time stamped data, Read Write Data to SD Card and develop to be Data Logger.
Board Feature :
- Support FAT16 or FAT32 file system on SD card (interface works with FAT16 or FAT32 formatted SD card) to be read by any plotting, analysis program, spreadsheet.
- Support SD card or SDHC card (Secure Digital High Capacity, SD 2.0) : SDHC memory card provides more removable storage power which increases card's storage capacity up to 32 GB.
- Plus1, including I2C EEPROM-24LC256 (32Kbyte) : Electrically Erasable Programmable Read Only Memory is a type of non volatile memory used in computers and other electronic devices to store small amounts of data that must be saved when power is removed.
- Plus2, including Real Time Clock (RTC-DS1307) timestamps all your data with the current time. Datetime format is YYYYMMDDHHMMSS between 1970-01-01 00:00:00 to 2037-12-31 23:59:59 (Year-Month-Day). RTC keeps the time going when power is removed.
- Including Libraries and Examples for learning quickly.
- RTC battery 3V (CR2032) backup lasts for years (this battery type is cheap price for maintenance).
- Including 3.3v level shifter circuitry prevents damage to your SD card.
- Onboard includes 3.3v regulator outputs a steady and stable 3.3V dc output direct to SD card.
- Including I2C Connector 4 pins will be connected with external I2C devices or other boards.
- Including Stacking Headers with Arduino Standard 0.1" Headers 8 pins & 6 pins will be stacked with other arduino motherboards.
- Board Dimension is 53.3mm(Width) * 68.6mm(Long) * 19.0mm(High).
Package Contains:
- SD Card Shield Plus for Arduino = 1 pcs.
- Free a RTC-battery 3V = 1 pcs.
- Free CD (schematic, example programs, full manual and etc.) = 1 pcs.
** Package Weight (Shipping Rate) = 100g.
Example : Read Write Program
Write data test.txt into the SD card.
Read data test.txt from the SD card.
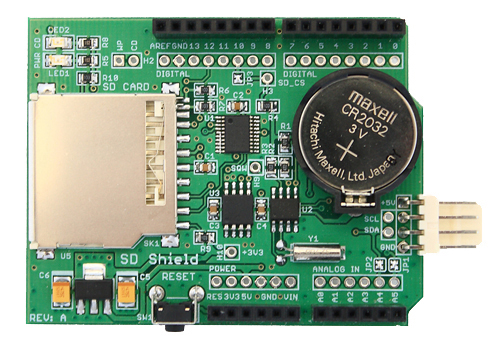
Board Description :

- SD Card Slot (Standard) will be connected with SD card.
- 3.3v regulator outputs a steady and stable 3.3Vdc output direct to SD card.
- Tact Switch will be reset operation of microcontroller (Arduino motherboard).
- I2C EEPROM-24LC256 (32Kbyte) : Electrically Erasable Programmable Read-Only Memory is a type of non-volatile memory used in computers and other electronic devices to store small amounts of data that must be saved when power is removed.
- Real Time Clock (RTC-DS1307) timestamps all your data with the current time. Datetime format is YYYYMMDDHHMMSS between 1970-01-01 00:00:00 to 2037-12-31 23:59:59 (Year-Month-Day).
- I2C Connector 4 pins will be connected with external I2C devices or other boards.
- RTC battery 3V (CR2032) backup lasts for years.
- 3.3v level shifter circuitry prevents damage to your SD card.
- LED1-PWR (Green LED) will be lighted when power is supplied into the SD Card Shield Plus.
And LED2-CD (Yellow LED : Card detection) will be lighted when inserted SD card. - JP3-Jumper (Default) will be selected SD_CS pin is connected with D10 pin but if user want to design SD_CS pin will be connected with other pins by de-solder JP3-Jumper (SD_CS pin is broken out of D10 pin).
- JP1-Jumper (Default) and JP2-Jumper (Default) will be selected SCL pin and SDA pin are connected with external I2C devices or other boards.
a) JP1-Jumper (Default) will be selected SCL pin is connected with A5 pin but if user want to design SCL pin will be connected with other pins by de-solder JP1-Jumper (SCL pin is broken out of A5 pin).
b) JP2-Jumper (Default) will be selected SDA pin is connected with A4 pin but if user want to design SDA pin will be connected with other pins by de-solder JP2-Jumper (SDA pin is broken out of A4 pin). - Stacking Headers with Arduino Standard 0.1" Headers 8 pins & 6 pins will be stacked with other arduino motherboards.
![]() More details please click here to download latest versions :
More details please click here to download latest versions :
![]() Starting SD Card Shield Plus for Arduino :
Starting SD Card Shield Plus for Arduino :
Example : Read Write Program
- Insert your SD card into SD card reader of your computer to format your SD card for FAT16 or FAT32 file system.
- After already formatted your SD card then take off the formatted SD card from SD card reader of your computer.
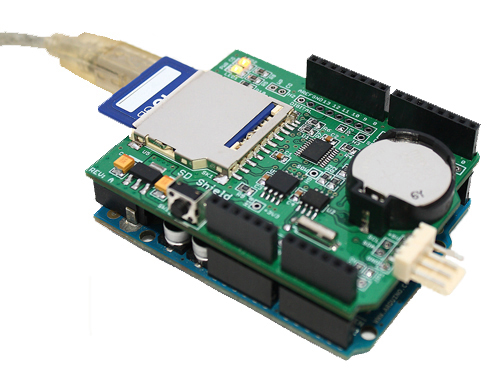
- Stack SD Card Shield Plus to your another arduino motherboard via Stacking Headers with Arduino Standard 0.1" Headers 8 pins & 6 pins.
- Insert the formatted SD card into SD card slot of SD Card Shield Plus and connects your another arduino motherboard to your computer via USB cable.
- Double click on icon “Arduino ” program (Or double click “Shortcut to arduino” on your desktop) to open arduino on your computer which a free CD includes SD card libraries and example programs.
- Write Data : Open an example program is ReadWrite program to will be tested this SD Card Shield Plus is choose File>Examples>Examples_SD_Shield >SD>ReadWrite”
- After opened an example program is “ReadWrite program” will be shown detail of the C language code.
- Choose “Sketch>Verify/Compile” or click icon to verify and compile the C language code.
- If the C language code is correct and not found data error then information will be shown “Done compiling” and “Binary sketch size.
- Choose “File > Upload to I/O Board” or click icon to upload program into your arduino motherboard.
- If completely uploaded an example program (ReadWrite program) then information will be shown “Done uploading” and “Binary sketch size.
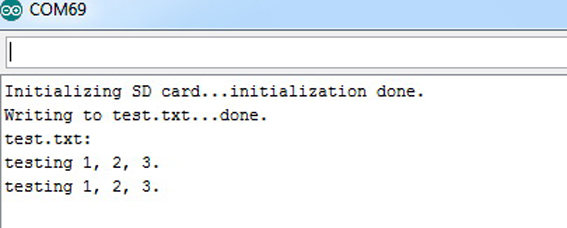
- Click icon is Serial Monitor to will be shown data about receives and sends data via the serial port.
- After clicked icon is “Serial Monitor” then will be shown “window of serial monitor ” is completely wrote “test.txt file” into SD card.
- You take off SD card from the SD card slot of SD Card Shield Plus.
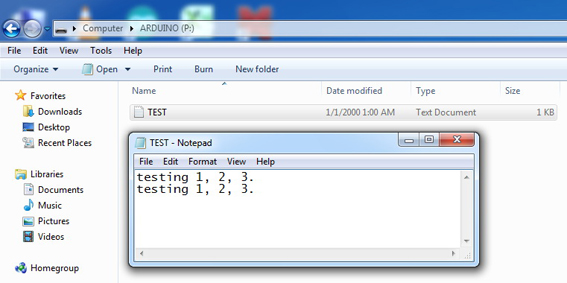
- Read Data : Insert SD card into the SD card reader of your computer then open data in SD card will be found “test.txt file” then double click “test.txt file” will be shown data is wrote into SD card.
Reference www.mlt-group.com


-80x80.jpg)


Powered By MLT
MLT © 2026
MLT © 2026